Electrical Station 4.2 LAB
Electrical Systems in Health
Examining Heart Structures and Blood Flow
Note: You MUST complete one of the scheduled CPR certification classes before you complete this lab station.
PRESENTATION AND PRACTICE
In the introduction, you learned A LOT about the structures of the heart, how it pumps blood, and how the electrical system tells the heart when to contract. Remember the heart has 4 chambers, each separated by either a septum or a valve: the left atrium, right atrium, left ventricle and right ventricle.
Also we discussed several different great vessels that are directly connected to the heart: the superior vena cava, inferior vena cava, pulmonary trunk, pulmonary arteries, pulmonary veins, and the aorta.
In this first activity, you will get to examine a life-size heart model and test your knowledge of these structures. Then you will check your answers and try to answer questions about blood flow through the heart using the model for help. Write down all of your answers on your answer sheet.
Work with the Model Heart
Identifying Structures: Instructions
*You are encouraged to go back to the introduction and use the diagram of the heart and its written description to help you.
- Pick up the model heart off of the stand by pulling the metal standrod out from the base.You should see numbers printed on the outside of the chambers and vessels.
- Write down the number printed on what you think is the right atrium.
- Write down the number for what you think is the left atrium.
- Keep using the heart to identify the numbers for all of the structures listed on your answer sheet. Don’t worry about being wrong, we just want you to try. For this part you will only be graded for participation. (Don’t forget to look all over the model, including the back!)
- The model comes apart into two pieces so that you can see the inside of the heart. Pull it apart and examine the inner structures.
- What are the white structures? Try to choose the correct answer on your answer sheet.
- What is the wall that separates the right ventricle from the left ventricle called? Choose the correct answer on your answer sheet.
- Ask the coach for the answer key and check your work. Cross out any wrong answers and write down the correct ones. Study the correct names of all of the structures while looking at the model.
Understanding Blood Flow: Instructions
On your answer sheet, try to match the letter of each structure listed in the word bank on the left with its correct statement on the right.
When you’re done,ask your coach for the answer key to the blood flow questions, and check your answers. Correct any wrong answers by crossing out the incorrect letter and putting the correct one. Study the correct answers.
Finding Pulse and Breathing Rates
In the introduction, you learned how CPR and AEDs can save someone’s life. But before you leap into action and start doing chest compressions, you need to make sure the person needs CPR first, right?
When you find someone who is unconscious, you need to check whether they are breathing and have a pulse.

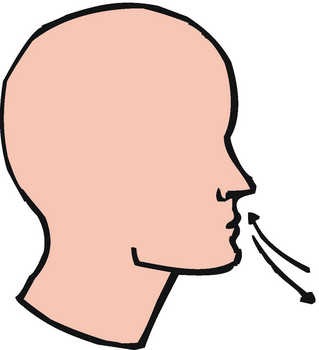
It is fairly easy to check for breathing. Usually you can tell when someone is not breathing by a lack of rise and fall of the chest. If you are unsure, you can put your ear to their mouth and see if you hear anything.
Note: Sometimes people will have what is called agonal breathing, or gasping. This does not count as effective breathing.
Current American Heart Association guidelines recommend that once you have determined that someone is unconscious and not breathing, you may begin CPR. If you are still unsure though, you can do a very quick pulse check.
There are two places where adults are usually checked for a pulse:
1.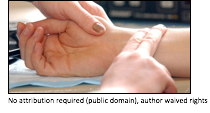 |
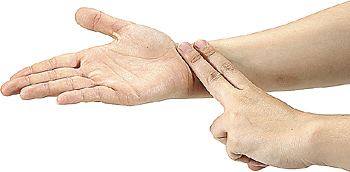
The radial (RAY-dee-uhl) pulse is found just above the wrist, on the thumb side of the forearm. However this is usually where a pulse is checked on someone who is awake. Try to find your radial pulse. |
2.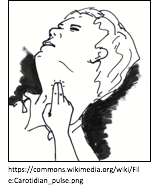 |
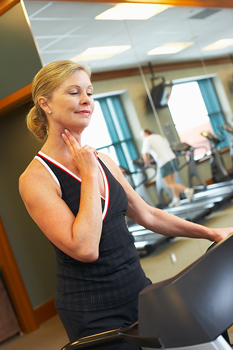
The carotid pulse is found on the side of the throat, right under the jaw bone. This is usually where a pulse is checked on someone who is unconscious, because it is much stronger. Try to find your carotid pulse.(Note: Fluid Station 1.1 covers instructions and practice on taking a person's blood pressure. To do that, you will also need to find a pulse in the process.) |
Notice that in both pictures the first two fingers are being used. ALWAYS check a pulse with your 1st and 2nd finger. NEVER use your thumb, because the thumb has its own pulse and you will actually mistake it for a pulse on the person you are checking. You will know you’ve found the pulse because you will feel a repeated “thumping” under your fingers.
This is blood being pushed through the arteries by the heart each time it beats.
When you are only trying to determine whether a pulse is present, simply feel for a pulse for about 10 seconds. If you feel nothing and have not already begun CPR, begin now.
When CPR is not needed, health professionals will often take a pulse and breathing rate as a part of normal vital signs to check someone’s overall health.
Pulse rate is the number of heart beats in one minute. You will often see this written as “bpm” which stands for “beats per minute.” But most people who check a pulse rate don’t actually count the beats for a whole minute. There are two options for calculating a pulse rate:
- Count the beats for 15 seconds and multiply by 4 (to get beats in 60 seconds)
OR
- Count the beats for 30 seconds and multiply by 2 (to get beats in 60 seconds)
The normal pulse rate for a resting adult is anywhere from 60 to 100 bpm.
Breathing rate is very similar, and is the number of breaths a person takes in one minute. Unfortunately this is also often written as “bpm” for “breaths per minute!” Again, most people will often only check for 15 or 30 seconds and multiply to get the number of breaths over a whole minute. Simply count the number of times the chest rises and falls over your chosen time period.
The normal breathing rate for a resting adult is anywhere from 12 to 20 bpm.
One thing to note is that it is important not to let the person know that you are checking their breathing, because they may get nervous and unintentionally change their normal breathing pattern. The easiest way to do this is to first take the pulse, say for 15 seconds. Remember the number of beats you counted, but then act like you are still checking the pulse while really you start counting breaths for the next 15 seconds. By the end of 30 seconds you have taken both rates.
Use the Answer Sheet Provided
- Practice finding your radial pulse on one arm, using your opposite hand. If you can’t seem to find it, ask your coach for help.
- Make sure you have either a watch or a clock within sight. Count the number of beats you feel for 15 seconds.
- Calculate your pulse rate using the equation discussed above. Write your results on your answer sheet.
- Now find another person who will let you check their pulse and breathing rate. Your coach is a good place to start. (Remember, when you start taking the breathing rate, don’t let them know or they will change their breathing pattern!) Record your results on your answer sheet.
- Take the pulse and breathing rate of two more people in the building, and record your results.
Your coach will take a pulse rate for him/herself and the two other people you choose as well, to see how close you were. Your coach will also take the breathing rate for the two other people you choose (but not for him/herself).
Performing CPR and Using an AED
Remember, there are two types of CPR you can do if you find someone who is unconscious, not breathing and pulseless:
- Hands Only CPR (compressions only)
- Full CPR with a face shield (30 compressions to 2 breaths)
First you will practice hands-only CPR using a manikin, and then add in an AED.
Hands Only CPR
Work with the manikin and face shield provided.
In this scenario, you are at the mall and come upon a group of people circled around a man who went unconscious a minute or two ago. You see an AED on the wall nearby. You run and get the AED, then return to the man.
- Get onto your knees at the side of the manikin. You will pretend that he is a real person from now on. Tell the bystander (your coach) to go call 9-1-1, and come back.Talk to the man and try to get a response.
- Next, check for breathing. Is the chest rising and falling?
- Finally, do a quick pulse check. Feel the carotid artery on the side of the throat for about 5-10 seconds.
- Once you have determined you need to do CPR, stand up on your knees and put one hand over the other. Place the base of the palm of your lower hand directly over the center of the chest.
- Push hard and fast, keeping the arms straight. You will hear a “click” with each compression IF you are going deep enough. If not, you to need push harder! Allow the chest to come up all the way before each compression. To get 100 compressions per minute, remember the beat to “Stayin’ Alive!”
- Your coach will time you for 2 minutes, which is considered one cycle of CPR. Ask the bystander to unzip and open up the AED case so you will have easy access to it.
- Pull out the AED and the adult pads. Turn on the AED and follow its commands.
- Resume CPR when the AED tells you to. Your coach will call “time” and end the scenario.
(Note: In real life you would have to continue giving CPR until an ambulance arrived. It can be very exhausting! If you do have another person there, it can help to switch the person giving compressions every 2 minutes.)
Now your coach will provide you with a face shield and walk you through full CPR with an AED.
Full CPR
This is the same scenario, except you have a face shield in a pouch on your key chain, so you will now be able to give full CPR. Again, you saw the AED, grabbed it, and returned to the unconscious man.
- Get onto your knees at the side of the manikin. Tell the bystander (your coach) to call 9-1-1.Talk to the man and try to get a response.
- Next, check for breathing. Is the chest rising and falling?
- Finally, do a quick pulse check. Feel the carotid artery on the side of the throat for about 5-10 seconds.
- Once you have determined you need to do CPR, stand up on your knees and put one hand over the other. Place the base of the palm of your lower hand directly over the center of the chest. Ask the bystander to get the face shield out from the pouch on your keys.
- Push hard and fast, keeping the arms straight. Remember you will hear the “click” if you are going deep enough. Count 30 compressions at the tempo of “Stayin’ Alive!”
- Place the face shield over the man’s face so that the valve is directly over his mouth. Hold the plastic down with both hands while tilting the head back to open the airway. Give two steady breaths, looking for the chest to rise. Ask the bystander to unzip and open up the AED case so you will have easy access.
- Return to chest compressions. Repeat giving 30 compressions to 2 breaths until you have done this a total of 5 times. This is one cycle of CPR (about 2 minutes).
- Pull out the AED and the adult pads. Turn on the AED and follow its commands.
- Resume CPR when the AED tells you to. You are going to do another full round of CPR and let the AED analyze again. After the AED has analyzed the patient again, your coach will call time to end the scenario.
(Note: Again, in real life, this process would need to continue until help arrived. If another person is available, it can help to switch the person giving compressions after every cycle of CPR - 5 sets of compressions and breaths.)
Application Questions – Write down your answers on your answer sheet.
- If you look at the heart model, do you notice that one of the ventricles has thicker muscular walls than the other? Which one? Why do you think this is?
- What differences did you notice between when you felt your radial pulse and when you felt your carotid pulse? Was one stronger than the other? Why do you think this is?
- Why is Hands Only CPR so effective, even though you are not giving them additional oxygen?
Evaluation
Your lab performance will be evaluated by the criteria (standards) you will find in this project’s rubric. A rubric is simply a table that states how you will be evaluated. Your coach will use this table to report your performance.
CLICK HERE TO GO TO THE RUBRIC
Lab Review
- The heart’s job is to pump blood containing oxygen and nutrients to the cells of the body.
- There are four chambers of the heart: the right atrium, the right ventricle, the left atrium and the left ventricle.
- The left chambers of the heart are separated from the right chambers by septae.
- The top and bottom chambers on both sides of the heart are separated by valves.
- The ventricles are also separated from the great vessels by valves.
- The heart has its own vessels that supply it with blood. They are the coronary arteries and veins. If one of these gets blocked, the heart will not get blood flow and the person may have a heart attack.
- Pumping of the heart is controlled by its own electrical system. Each pump is started by an electrical signal at the SA node, often called the “pacemaker.”
- Cardiac arrest is when the heart is not pumping blood efficiently enough to supply the body with enough blood.
- Certain heart rhythms cause cardiac arrest, and sometimes a shock can reset the normal rhythm.
- Early CPR and use of an AED significantly improves a person’s chances of surviving cardiac arrest.
- CPR can be given in the Hands Only form, or full CPR can be given if a face shield is available. Full CPR uses a ratio of 30 compressions to 2 breaths.
- AEDs are so easy to use that they can now be found in many public places all over the world.
__________________________________________
![]()
Links to Station 4.2 Modules
Lab Intro | Lab Presentation and Practice | Communications Intro| Communications Presentation and Practice| Math