Mechanical Station 2.2 LAB:
Mechnical Systems in Health
Investigating Antagonistic Muscles
Presentation and Practice
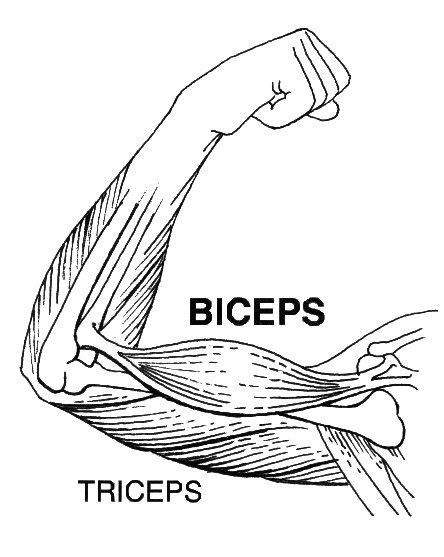
Remember, antagonistic muscles are pairs of muscles that work opposite of each other. The two major muscles of the upper arm, the biceps brachii (or just biceps) and the triceps brachii (or just triceps), are a pair of antagonistic muscles. When one of these muscles contracts, the other always relaxes.
In this experiment you will test how contraction of the biceps or triceps effect movement, using a model arm and rubber bands to represent the muscles.
LAB: WORK WITH THE MODEL ARM AND ANSWER SHEET PROVIDED
CLICK HERE for Answer Sheet. (Word document)
Muscle Lengths
- Stretch a rubber band between pegs A and B on the arm model to represent the biceps muscle. Which peg is the origin and which peg is the insertion for this muscle? Write down your answers on the provided answer sheet.
- Stretch another rubber band between pegs E and F on the arm model to represent the triceps muscle. Again, which is the origin and which is the insertion? Write down your answers.
- Bend the arm and observe what happens to the lengths of both rubber bands. Which rubber band gets shorter and which gets longer when you bend the arm? Write down your answers.
- Now straighten the arm and observe the rubber band lengths again. Which rubber band gets shorter and which gets longer when you straighten the arm? Write down your answers.
Contraction and Movement
- Now you will add more rubber bands to create different contractions. What do you think will happen when you make the biceps muscle contract? Write down your prediction.
- Add another rubber band to the biceps muscle (between pegs A and B) to make it contract. How did the arm move? Write down your observation.
- What do you think will happen now when you add a rubber band to the triceps side so that both muscles are contracting equally? Write down your prediction.
- Add a second rubber band to the triceps muscle (between pegs E and F) to make it contract equally to the biceps muscle (two rubber bands each). How did the arm move? Write down your observation.
- What do you think will happen now when you add another rubber band to the triceps side so that it contracts? Write down your prediction.
- Add a third rubber band to the triceps muscle (between pegs E and F) to make it contract. How did the arm move? Write down your observation.
- Continue experimenting with the arm by adding rubber bands (contraction) or removing rubber bands (relaxation). Write down any additional observations you make. Take all of the rubber bands off when you are finished.
Testing Mechanical Advantage
For this activity, you will be working with a measurement called force. Watch this video below to learn more about force:
https://www.youtube.com/watch?v=LEs9J2IQIZY
So, we are being acted on by forces all the time! Even gravity puts a force on us that keeps us from floating off into space. Also, every time we move something using our bodies, we are creating a force using our muscles to push or pull an object.
Force is measured in a unit called Newtons(named for Isaac Newton who discovered gravity!) Force is calculated using the equation F=m x a. In this equation, m is mass and a is acceleration (ex-sell-er-AY-shun).
Mass is the amount of matter (or stuff) that makes up an object. Mass is always measured in kilograms, which is a metric unit that many countries use instead of pounds. One kilogram is equal to 2.2 pounds.
 |
Acceleration is how much time it takes for an object to move from one speed to another. For example, if you were in your car and went from 0 miles per hour to 10 miles per hour over 1 second, the acceleration would be 10 miles per hour per second. Usually though, speed has the unit of “per second” instead of miles per hour, so acceleration is often written with the units “per second per second.” This probably seems strange, but if it doesn’t make sense, don’t worry too much about it right now. |
When we talk about how much we weigh, this is actually different from how much mass we have. Weight is actually a force equal to our mass multiplied by acceleration due to gravity, called “g” on Earth. Have you ever heard of g-forces? That is what they’re talking about! Watch this video to learn more about this difference: |
 |
https://www.youtube.com/watch?v=SegMt7sa42E
In the first part of this activity, you will calculate the resistance force that will be put on the model arm. Remember, resistance force is the force put on an object that must be overcome by the effort force in order to move the object. In this case, the resistance force will be equal to the weight of the forearm, plus the hanger and the discs we hang from it. Remember, weight is actually a force!
WORK WITH THE MODEL ARM AND ANSWER SHEET PROVIDED
Calculating Resistance Force
You will hang all seven discs from the arm using the provided hanger. But to calculate the resistance force, you need to use the mass of all of the discs, the hanger, and the forearm put together because all of these will be lifted by the effort force we put on the arm later.
- The total mass of all of these parts together is 0.174 kilograms. Write this number in the box under the “Total Mass” column on your answer sheet.
- Acceleration due to gravity or “g” is always equal to 9.8 meters per second per second. Again, if these weird units don’t make sense right now, don’t worry. Just write 9.8 under this column on your answer sheet.
- Now, to calculate the resistance force (or weight), we will use the force equation from above: F=m x a. The m is the number you wrote under the “Total Mass” column, and the a is the number you wrote under the acceleration column. Multiply these two numbers using the calculator.
- The number you get is the resistance force in Newtons. Write this number in the box under the “Resistance Force” column on your answer sheet.
Measuring Effort Force
Now you will try different points of insertion for the biceps muscle to bend the elbow and raise the forearm. Changing the insertion actually changes the amount of effort force needed to create this movement.
- Take the string with loops tied at both ends, and attach one end to peg B on the forearm. Run the string over peg A at the top of the arm, and hang the spring scale provided from the loop at the other end of the string.
- Gently pull straight down on the spring scale using your finger. Make sure to keep the spring scale in line with the black metal bar that is holding up the arm.
- Keep pulling on the spring scale until the guidelines on the upper and lower arm meet to make a straight up and down line.
- Once you see the line, hold everything exactly where it is, and read the number (in Newtons) on the spring scale. (Note: Be careful and try to hold still. The numbers on the scale will be upside down so this may be tricky.)
- Slowly let go of the spring scale and allow the arm to straighten out. Write down the number you read on the scale under the “Effort Force” column in the row for peg B.
- With everything in the same places, move the loop that was attached to peg B over to peg C. Repeat steps 2 through 4 to find the new effort force.
- Slowly let go of the spring scale and allow the arm to straighten out. Write down the number you read on the scale under the “Effort Force” column in the row for peg C.
- Finally, with everything in the same places, move the loop that was attached to peg C over to peg D. Repeat steps 2 through 4 to find the new effort force.
- Slowly let go of the spring scale and allow the arm to straighten out. Write down the number you read on the scale under the “Effort Force” column in the row for peg D.
Calculating Mechanical Advantage
Remember, mechanical advantageis a number that tells you how much the lever either multiplies or lessens the effort force applied to it. First-class levers make it easier to move an object by multiplying the effort force you put in. Third-class levers make it harder to move an object by lessening the effort force you put in.
Using the biceps muscle to bend the elbow is a third-class lever because the fulcrum (elbow joint) is at one end, the resistance force (hand and forearm) is at the opposite end, and the effort force (biceps insertion) is between them.
You will now use the effort forces we just found and the resistance force we found in the first part of this activity to find the mechanical advantage for each insertion (peg) that you tried.
- Take the number you found as the resistance force in the first activity, and write it in all three boxes under the “Resistance Force” column on your answer sheet. (This stayed the same during our experiment because you did not change the weight of the forearm or the discs.)
- The equation for finding the mechanical advantage is:

->Use the calculator to find the mechanical advantage for peg B using this equation. (Divide the resistance force by the effort force that you found for peg B). - Round the number you get with the calculator to only two decimal points. Then write your rounded number under the “Mechanical Advantage” column in the row for peg B.
- Now do the same calculation with the forces for peg C. (Divide the resistance force by the effort force that you found for peg C).
- Round the number you get with the calculator to only two decimal points. Then write your rounded number under the “Mechanical Advantage” column in the row for peg C
- Finally, do the same calculation with the forces for peg D. (Divide the resistance force by the effort force that you found for peg D).
- Round the number you get with the calculator to only two decimal points. Then write your rounded number under the “Mechanical Advantage” column in the row for peg D.
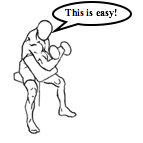 |
Did you notice that the mechanical advantage got bigger as you went from using peg B to peg D? The mechanical advantage getting bigger means that it became easier (required less effort force) to overcome the resistance force each time. What changed? Image modified from http://commons.wikimedia.org/ wiki/File:One-arm-preacher-curl-2.gif |
Measuring the Effort Arm
The answer is that you changed the effort arm. Remember, the effort arm is the distance from where you apply the effort force (the insertion of the biceps muscle – peg B,C, or D) to the fulcrum (the elbow joint). Now you will find the effort arm of each peg that you tried.
- Remove the spring scale, string, hanger and discs from the arm model.
- Use the tape measure to find the distance in centimeters from peg B to the center of the elbow joint (the screw in the middle of the bigger metal circle).
- Record this number under the “Effort Arm” column in the row for peg B.
- Now use the tape measure to find the distance in centimeters from peg C to the center of the elbow joint. Record this number under the “Effort Arm” column in the row for peg C.
- Finally, use the tape measure to find the distance in centimeters from peg D to the center of the elbow joint. Record this number under the “Effort Arm” column in the row for peg D.
Do you notice a pattern?
Graphing
You can make a visual image of this pattern by creating a line graph. Follow the instructions below to create your graph using the grid sheet provided.
CLICK HERE to download the grid sheet (Word document)
- You will make three data points (or dots on the graph) total, one for peg B, one for peg C and one for peg D. One data point uses the numbers you found for mechanical advantage and effort arm distance for that peg.
- To create the data point for peg B, the horizontal (left and right) axis will be your effort arm distance in centimeters. Find your number along that line. Each line on this axis is equal to 0.2 of a centimeter, so if you have an odd number, you will have to stop in the middle between two lines. Do not draw the dot yet.
- Starting from your number along the horizontal axis, move up on the vertical (up and down) axis to find the line that has your number for mechanical advantage. Each line on this axis is equal to 0.01, so you should be able to find the exact line of your number.
- Once you have found the spot in the graph where your two numbers meet (or intersect), draw your dot.
- Repeat steps 2 through 4 using the numbers for peg C to get your second data point.
- Finally, repeat steps 2 through 4 one more time using the numbers for peg D to get your last data point.

Use a ruler or something with a straight edge to draw a line between the first and second point. Do the same between the second and third point. Now you have a line graph! Line graphs are useful because they allow you to make predictions:
Let’s say that now you wanted to figure out what the mechanical advantage might be with an effort arm distance of 7 cm. You could simply use your finger to start from 7 cm on the horizontal axis, and move up to your line. Then at the point where you ran into your line, you could move your finger left to the vertical axis and see what the number is there. This would give you a good prediction for mechanical advantage at that effort arm distance!
APPLICATION QUESTIONS – Write down your answers on your answer sheet
- Can you think of another part of the human body that uses a pair of antagonistic muscles?
- What is the benefit of the elbow’s poor mechanical advantage? In other words, we trade needing more effort to bend the elbow so that we can have what?
- Use your graph to make a prediction of the mechanical advantage for an effort arm that is 9 cm long.
EVALUATION
Your lab performance will be evaluated by the criteria (standards) you will find in this project’s rubric. A rubric is simply a table that states how you will be evaluated. Your coach will use this table to report your performance.
CLICK HERE TO GO TO THE RUBRIC
LAB REVIEW
- There are three types of muscle in the body: cardiac and smooth muscle, which are involuntary, and skeletal muscle which is voluntary
- Skeletal muscles are made up of several layers of fibers that get smaller and smaller until you get to the actual unit of contraction called the sarcomere
- The skeleton, muscles and tissues that attach them all make up the musculoskeletal system
- Each muscle has at least two attachment points. The one closer to the center of the body is called the origin. The one further from the center of the body is called the insertion.
- Muscle pairs that have opposite functions are called antagonists. Muscles pairs that help to create the same movement are called synergists.
- A lever is a type of simple machine that changes the direction or amount of force required to move an object.
- The amount of effort force needed to move an object depends on the type of lever, the resistance force, the effort arm and the resistance arm.
- Mechanical advantage is a number that shows whether a lever makes it easier or harder to move an object.
- The elbow is a third-class lever that actually makes it harder to lift the forearm by lessening the effort force we put in. We trade needing more effort to bend the elbow for more range of movement.
__________________________________________
![]()
Links to Station 2.2 Modules
Lab Intro | Lab Presentation and Practice | Communications Intro| Communications Presentation and Practice| Math