Fluid Station LAB 1.2
Fluid Systems in Health Fields
I.V. Therapy

Presentation and Practice
In this lab you will learn how to identify urine that is concentrated as a result of dehydration (don’t worry it’s fake), and gain a general idea of how to place an IV to give someone fluids.
Note: Giving fluids by placing an IV is a complex skill that must be taught in an official setting. DO NOT attempt what you learn here in real life. You must go through formal medical training to do this.
Measuring Volume and Weight of Simulated Urine
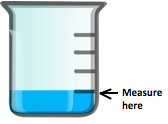
- You should have two beakers of colored water, or “simulated urine,” labeled #1 and #2. Measure the volume (or space) occupied by the fluid in each by looking at the number on the side of the beaker. The top of the fluid is where you read this number. (Volume in medicine is usually measured in milliliters or mLs).
- Record the volumes you find for each beaker. Are the volumes the same or different?
- Place beaker #1 on the scale. Read the weight and document your result on your answer sheet.
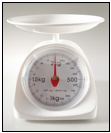
- Place beaker #2 on the scale. Read the weight and document your result on your answer sheet.
- Find the weight of each fluid alone, without the weight of the beaker. To do this, simply subtract the weight of the beaker from the weights you found for each. Write these answers under the “Adjusted Urine Weight” columns for beakers #1 and #2.
- Now find the density for each fluid. To do this, use the calculator to divide the adjusted weight by the volume of fluid for beaker 1. Do the same for beaker 2. Record your results on your answer sheet.
Which beaker contains urine that would suggest the person may be suffering from dehydration? Why did you choose the beaker you did? Write your answer on your answer sheet.
Simulated IV Insertion
First, you will read through the steps with your coach.
Second, you will observe your coach perform the procedure.
Finally, you will perform the procedure with your coach’s assistance.
Note: The IV practice model and procedure you will be using today is not an accurate representation of real-life IV placement.
| Normally, IV insertion requires the use of an IV catheter, or needle with a plastic sheath that can be left in the vein when the needle is removed. Today you will simply be practicing how to hit the vein with a plain needle. | 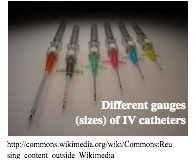 |
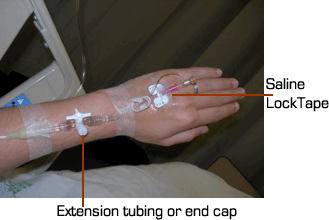 |
IV insertion also requires that after needle removal, the catheter must be secured to the patient and labeled with the date, time, gauge of catheter, and your initials. |
Remember: Actual IV placement is only performed by trained medical professionals. Do NOT attempt this procedure under any circumstances without the appropriate training and certification.Pretend that your coach is your patient except for the part where you are actually preparing and inserting the IV needle.
- Introduce yourself to the patient – they have the right to know who is caring for them.
- Explain the procedure you are about to perform. Make sure the patient is awake, alert and able to understand you– they have the right to make informed decisions.
- Get verbal consent from the patient – they have the right to choose
- Ask the patient if they have ever had an I.V. before. If they have, ask them if they have had any problems.
- Ask them if they have a preference for where the IV is to be placed.
- Make sure they are sitting, or preferably lying down.
- Make sure you have the necessary equipment:
- Gloves
- Alcohol prep pads
- IV Pole (or table-top hanger in this lab)
- IV Solution
- IV Tubing with roller clamp
- IV needle with tubing
- Inspect the solution for the following:
- Correct solution (normal saline, 0.9% sodium chloride)
- Expiration date
- Container not broken/leaking
- Wash your hands
- The IV bag will be full and already set up for you. There is a clear drip chamber (like a cylinder shaped balloon) on the tubing connected to the IV bag. Ensure that this and the tubing are full of the IV fluid. If not, squeeze the drip chamber until it is half full with solution from the bag.
- You should have another small piece of tubing connected to a needle that has a purple tab on it. Connect the end without the needle to the end of your IV tubing, near the roller clamp (the blue plastic piece).
- Slowly open the roller clamp by rolling the plastic wheel up the tubing. Flush the solution through the tubing until it drips out the end of the needle, but do not remove the needle cap yet.
- Once it begins to drip, close the roller clamp by rolling the wheel down the tubing.
- Put on your gloves.
- Palpate (press with your finger) for a good vein on the arm section. Make sure it is firm and round. When you press the vein and let go, it should rebound quickly or “bounce back.”
- Using the alcohol prep pad, clean around the insertion site and allow it to dry completely.
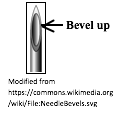
- Hold onto the purple tab under the needle using the thumb and forefinger of your dominant hand. Uncap the needle, and position it with the hole in the needle, also called the bevel, up so it is facing you. This makes it easier and less painful to penetrate the skin.
- Gently pull down on the skin below the insertion site with the thumb of your non-dominant hand.
- Tell the patient that he or she is about to feel a poke.
- Hold the needle at about a 20 degree angle to the arm section, and quickly pierce the skin.
- Once the needle is in, slowly advance it until you feel a small “pop,” or decrease in resistance. This indicates that you have entered the vein.
- Slowly release the roller clamp to allow fluid to flow into the vein. If you were successful, fluid should start to drip out of the yellow tubing coming out of the side of the arm section.
- If fluid does not start to drip out of the tubing, close the roller clamp and either advance the needle a little more until you think you are in the vein, or pull the needle out and retry. Once you think you are in the vein, open the roller clamp and again check for dripping out of the yellow tubing.
- Your coach will need to verify that you successfully penetrated the vein and are administering fluids to the “patient.” Once your coach has verified this, close the roller clamp.
- Ask the patient if he or she is comfortable, and if there is any extreme pain at the site. Check for adverse reactions such as redness, swelling and itching.
- Do NOT remove the needle from the arm section. Your coach will remove and recap the needle for you.
- On your answer sheet, fill out the table that says “Patient Chart” with all of the following information (some other information that would be required will already be filled in for you):
- Document what you just did
- Date and time
- Number of attempts
- Any adverse reactions or complaints by the patient
Application Questions – Write down your answers and submit them to your coach.
- List at least 5 signs or symptoms of dehydration.
- What color would you expect a dehydrated person’s urine to be? Would it be more or less concentrated than a hydrated person?
- Why is that when someone receives IV fluids, they are usually given normal saline? In other words, what aspect of the blood would be changed if pure water was given instead?
Evaluation
Your lab performance will be evaluated by the criteria (standards) you will find in this project’s rubric. A rubric is simply a table that states how you will be evaluated. Your coach will use this table to report your performance.
CLICK HERE TO GO TO THE RUBRIC
LAB REVIEW
- Fluid balance in the body is the balance between fluids going into the body and fluids going out of the body.
- The fluids in the body circulate: blood moves through the vessels, and other fluids move between the body’s compartments and spaces.
- Movement between compartments depends on the concentration of different substances in the body fluids.
- Concentration is a measure of how much of one substance is dissolved in a certain volume of some type of fluid.
- A more concentrated fluid also has a higher density, which is a measure of how much matter is occupying a certain volume.
- Movement of water from an area of low concentration to high concentration across a semi-permeable membrane is called osmosis.
- Normal urine is clear, straw colored, and has no sediment, whereas concentrated urine is dark yellow, cloudy, has a higher density, and often has sediment.
- Dehydration is defined as a loss of greater than 1% of total body fluids without replacement.
- Dehydration can vary from a mild to a severe, life-threatening condition. The severity of dehydration can be determined by the signs and symptoms a person is having.
- The quickest way to treat severe dehydration is by giving a person fluids through an IV.
__________________________________________
![]()
Links to Station 1.2. Modules
Lab Intro | Lab Presentation and Practice | Communications Intro| Communications Presentation and Practice| Math